After giving the turbo on our WRX a little room to breathe with the addition of a full 3" Invidia turbo back exhaust and up pipe. We decided to open up the turbo from the other end by installing a new 2.5" cold air intake.
Background
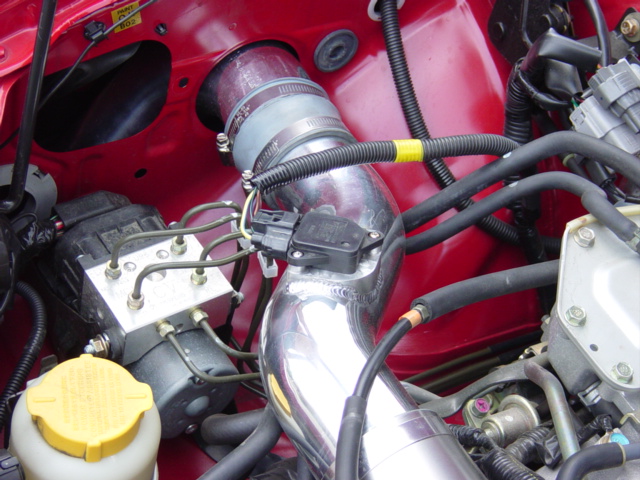
This intake was an ebay special. For $30 bucks we figured, "Hey why not?". The intake consisted of two polished mandrel aluminum pipes and an open element air filter. One pipe resides in the inner passenger fender and mounts the air filter down behind the passenger fog light. The second pipe connects the first to the factory rubber turbo intake pipe and has provisions to mount the Mass Air Sensor.
Install
First thing is first, tearing down the engine compartment. To put in the new intake, the old air box had to come out. Two screws held it to the body. After unbolting it, disconnecting it from the turbo inlet pipe, and unplugging the MAS we pulled the box and the filter out. Next we had to start removing all the plastic duct work that goes from just under the hood through the fender and into the air box. Getting at the ducting in the fender required pulling back the fender liner in the passenger wheel well and removing the passenger undercover on the bottom of the car. We took out the two screws holding the plastic and pulled it out the bottom.
To install the CAI we first mounted the filter on the longer pipe that runs through the fender and slid it up from the bottom. This is where we ran into our first "Ebay Special" the bolt holes on the intake pipe didn't match the holes on the frame of the car. After scratching our heads for a good while over a beer or two, we opted to enlarge the holes on the intake pipe and bend the tab a little to get everything to line up. No sweat.

When we went to attach the smaller intermediate pipe we found "Ebay Special" #2. The ends of the pipe weren't round! We were afraid that putting on a lop sided pipe would prevent the couplers from sealing all the way resulting in an intake leak. Something that really makes turbo cars tempermental. Back to scratching our heads and back to the beer. We finally settled on gently tapping out the dents with mallet until the pipe was as close to round as we could get it. At this point all we had to do was tighten down some hose clamps and bolt in the MAS sensor. After putting the undercovers back on and double checking everything we fired her up.

Total install time clocked in right at about 3 hours, not too shabby. Although the fitment and quality of this piece is not top notch by any means we thought we'd give it a shot. Even though we had to improvise a little and the install took longer than it should have, for us we would rather spend an extra hour and save $100. Performance is most likely comparable to other intakes and with the money we saved we are that much closer to that next mod. In the end it is all opinion, some people prefer name brand and some people race on a budget. For what its worth, this Ebay special seems to do the trick on the Project WRX, but your mileage may vary.
Impressions
We noticed a good bit more turbo noises, i.e. spooling and the BOV. While its hard to tell from the butt dyno the hp we picked up from this, every little bit helps. And opening up the intake tract will show even bigger gains as we up the boost, upgrade the turbo, and start flowing more air. We are heading to the dyno soon so be sure to check back and see what kind of hp the scooby is putting down.
WARNING!
Because this intake puts the air filter very very close to the ground, make sure you put the lower engine cover back on and there are no holes in it. You do not want to drive through a puddle and suck all that water into your engine. Hydrolocking a motor because you were too lazy to take 5 minutes to reattach the undercover would be a fate we wouldn't wish upon our most mortal of enemies!
 AF Project Vehicle | Corporate