Many people ask frequently about braking systems, and what is better and what is usable.
Everyone wants to go faster, handle better, braking is often ignored, mainly do to the price of major upgrades. After research and some experience most people will find that, big brake kits, slotted, cross-drilled rotors have not made a huge dent in 60-0 or 70-0 stopping distances.
In this article we will look at what is important in stopping a vehicle and what factors are involved. The reader should remember the concepts behind braking in this article. These concepts are universal, no matter what vehicle, we talk of, improving stopping distance is a matter of applying applications based on driving habits and driving conditions.
Read on and find what you need to start stopping faster.
The following are terms you should know and have been supplied by brake system experts.
Clamping force:
The clamping force of a caliper in pounds is the brake line pressure multiplied by the total piston area of the caliper in a fixed caliper and two times the total piston area in a floating design. To increase the clamping force it is necessary to either increase the line pressure or the piston area. Increasing the pad area or the coefficient of friction will not increase clamping force.
What does this mean? That your clamping force of your caliper and brake subsystems has nothing to do with pad design or makeup nor does it have anything to do with the type of disc used.
This next bit of information is really the basis for stopping the vehicle. Improving this area will get your vehicle stopping faster
Coefficient of friction:
A dimensionless indication of the friction qualities of one material vs. another. A coefficient of 1.0 would be equal to 1g. The higher the coefficient, the greater the friction. Typical passenger car pad coefficients are in the neighborhood of 0.3 to 0.4. Racing pads are in the 0.5 to 0.6 range. With most pads the coefficient is temperature sensitive so claims that do not specify a temperature range should be viewed with some suspicion. The optimum is to select a pad with a virtually constant but decreasing coefficient over the expected operating range of temperatures. As a result, the driver does not have to wait for the pad to heat up before it bites, and the pad fade will not be a factor so that modulation will be easy
Now that we have a foundation we can see that finding the pad of the right material and heat range affects your braking efficiency. You don't want a pad race pad for the street, because you have to heat it up to its approriate heat range before it bites. Not to far of from racing tires where their operating range is higher, so getting them to stick requires more heat.
The difference is here you pick a pad for your car based on driving habits, much like you would tires.
If you are on the brakes non-stop and generating excessive amounts of heat then you want a pad and rotor combo designed to bite or grip at higher temps.
On the street we want bite right away thus a pad with a lower operating temp, and the trade off is fade at higher temps, (excessive braking or high speed braking) or reduced bite.
Here is a run down of some common types of materials.
Carbon/carbon brake:
A braking system in which both discs and pads are manufactured from carbon composite material. Utilized in every form of racing where they are not outlawed, carbon/carbon brakes offer significant reduction in rotating mass and inertia along with much greater thermal capacity and dimensional stability in use. The disadvantages include cost, a certain amount of lag time while heat builds up (especially in the wet) and some difficulty in modulation. Contrary to popular belief, the coefficient of friction is no better than that of state of the art carbon metallic pads and cast iron discs. A major advantage on super speedways is the reduction of gyroscopic precession on corner entry.
Carbon metallic:
This is a trademark of the Performance Friction Corporation. Pad friction compounds containing large percentages of pure carbon along with various metallic elements. Pioneered by Performance Friction Corporation these compounds offer very constant coefficients of friction vs. temperature characteristics along with increased thermal capacity. The disadvantage is that, since they both operate at higher temperatures and their temperature rises to operating temperature faster than other compounds, they increase thermal shock to the disc and increase thermal conduction to the caliper pistons and brake fluid. As a result, it is recommended to not use drilled discs with carbon metallic pads.
Thermal shock or disc exposure to extreme temps causes a break in the bonds of the metals used in the discs which can cause cracking.
Thermal shock is different from bluing which is a result of thermal stress on cast iron rotors, but is normal for brakes that are exposed to hard braking, it will however lead to shorter rotor life
Now on to Brake System Break in.
Bedding in: There are two types of "bedding in" with regard to brakes:
- Bedding of the friction material. All friction materials contain volatile elements used as binders. In the initial thermal cycling of the material these volatiles boil off, forming a gaseous layer between the friction material and the brake. A bedded pad will exhibit a layer of discolored material from 1.5 to 3 mm thick.
- Bedding of the disc. Before using a new disk, all machining and preservative oils must be completely removed following the disc manufacturer's recommendations. Usually it involves washing with soap and water or using one of the proprietary "brake clean" compounds. The disc should then be mounted and checked for run out. It should be bedded in with a number of moderate stops with lots of cool off time between stops, gradually increasing the severity of the stops until the entire surface of the disc is evenly discolored. This will prevent thermal shock, distortion and the formation of "hot spots" (regional deposition of pad material which results in a permanent transformation of the cast iron underneath the deposit) and ensure maximum disk life.
To properly break in your pads and rotors we now know the importance of bedding in the materials.
When new pads are installed to bed them in run them through one complete heat cycle. This may vary based on the type of pad and its heat range. After one cycle has been completed allow them to fully cool before subjecting them to race conditions.
It is best to bed new pads on bedded rotors, that are smooth and flat (Re-surfaced on a lathe) with no hot spots or bluing. When using new pads and rotors it requires a more delicate break in process. Heat cycling the pads once means more time for cooling the pad and rotor.
Here is a practical way to bed pads. (Assuming you just installed the new pads)
You should start by finding a safe location, uncrowded area preferably a track. Warm up the motor, and vehicle. Start with a series of low speed light braking manuvers to check brake system intgrity, post pad install. In a closed area or safe spot start with harder stops from lower speeds 25-40 MPH. Slowly increase the speed and stopping power until they reach there specified heat range. This may be difficult to tell, a true sport pad's manufacturor will provide a heat range. After a series of 3-6 60-0MPH stops the pads should be cycled, you can always check the pad with a prod type thermometer or thermo pyrometer.
When the higher speed hard stops are applied if fade is evident begine the cool down process. Slow down, avoid using the brakes, and drive until you can park the vehicle to allow the pads and rotors to reach atmospheric temperatures, before doing any racing or hard driving.
Following this procedure will maximize pad life, maximize the co-efficient of friction bewteen the materials.
Now that you have that down lets get to the pedal effort you were talking about. This is called modulation. The stiffer and tighter the pedal is the less force is transfered to the clamping system via the booster, and master cyl. The higher the pressure in the brake lines and more pedal travel you have equals more force.
More pedal travel=Higher system pressure/clamping force harder to modulate
Stiffer pedal/tighter=Less pressure easier to modulate
Modulation:
The term given by the process by which the skilled driver controls the braking torque to maintain maximum retardation without locking wheels. Because the human being modulates most efficiently by force rather than displacement, effective brake modulation requires minimum pedal travel and maximum pedal firmness
The pads and rotors do not change this. They may increase your systems ability to increase hydrolic pressure though.
Mechanical pedal ratio:
The brake pedal is designed to multiply the driver's effort. The mechanical pedal ratio is the distance from the pedal pivot point to the effective center of the footpad divided by the distance from the pivot point to the master cylinder push rod. Typical ratios range from 4:1 to 9:1.The larger the ratio, the greater the force multiplication (and the longer the pedal travel)
This ratio can be adjusted by the installer.
So now you can see that brake modulation is key for controlling your braking to keep teh car stable, and has nothing to do with actual with
braking efficiency or braking tq.
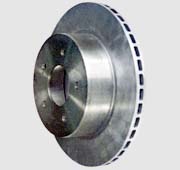
There seems to be a misconception of what a ventilated disc is.
this is a ventilated disc
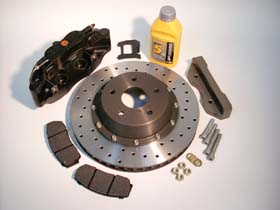
This is a cross-drilled, slotted solid non-ventilated rotor.
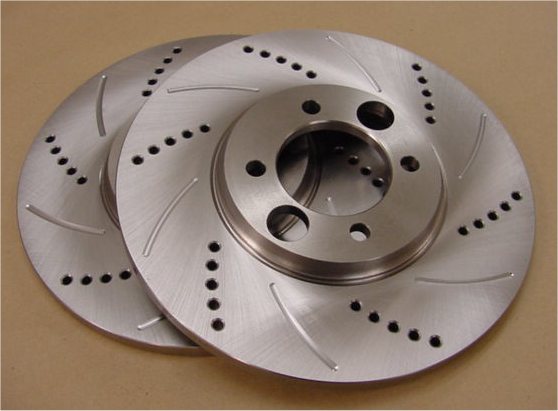
This is a slotted ventilated disc
Many asked about the cross drilled rotors and how they help cool the brake system. Well here is the short answer, air cools them, and without ducting running to your brake discs they are hardly more effective than your standard ventilated disc. The slotted rotors are for gassing, when the pads reach their operating temps or higher they start to gas or breakdown and the slots are there to allow the gas to escape.
So what cross drilled rotors do is reduce suface area decrease co-efficient of friction and are more prone to thermal shock, and cracking unless, you have a specialized braking system using, special brake fluid, stainless steel brake lines, venting all the necessary items to aid in convection
Convection:
One of only three heat transfer mechanisms. Conduction and radiation are the other two. Convection is the transfer of heat by fluid flow. Air can be considered to be a fluid in a thermal model of a brake system when it is moving and is contact with the heated surfaces of the disc or drum. In the case of a solid disc the air moving over the surface of the disc is very random and turbulent, but still functions to provide some cooling. In the case of a ventilated disc, by the pressure of a forced air duct or by induced flow that is a result of the centrifugal acceleration of the air already in the vent of a rotating disc, air flows through the vents. The air absorbs thermal energy along the vent path. In this way, the heat generated by the braking system of an automobile is transferred to the moving air stream and away from the brake disc.
As far as cross drilled rotors go, the advent of carbon metallic friction materials with their increased temperatures and thermal shock characteristics ended the day of the drilled disc in professional racing. They are still seen (mainly as cosmetic items) on motorbikes and some road going sports cars. Typically in original equipment road car applications these holes are cast then finished machined to provide the best possible conditions by which to resist cracking in use. But they will crack eventually under the circumstances described in another section. Properly designed, drilled discs tend to operate cooler than non-drilled ventilated discs of the same design due the higher flow rates through the vents from the supplemental inlets and increased surface area in the hole. That's right, inlets, the flow is into the hole and out through the vent to the OD of the disc. If discs are to be drilled, the external edges of the holes must be chamfered (or, better yet, radiused) and should also be peened.
Thanks to By Stephen Ruiz, Engineering Manager and
Carroll Smith, Consulting Engineer at STOPTECH LLC for technical definitions.
It's true, there are many pads available, for the tuner, knowing the a person's driving style will help the average Joe make a educated choice when upgrading brake components.
"Big Brake" kits look great on paper, and on the car, most people would be more excited about doing a kit with big calipers and rotors because of those reasons. However, upgrading calipers and rotors does not mean that the car will stop faster. Chances are if the manufacturer has a brake system designed with one piston calipers clamping 7" disks, that probably means the other brake system components won't be taking full advantage of the. A tuner can't always upgrade one system, if there is a weak link elsewhere. The systems have to be looked at as a whole. Most brake articles on the net talk about this, treating the brake systems as a whole. What they don't mention typically, is that OEM makers don't produce perfectly designed brake systems. The pad and rotor combos used on most cars are to get them stopping quick and lasting long. Which brings this article to the main point: throwing on a sport pad is the easiest way to increase your COF, and will increase efficiency. If the tuner drives hard the OEM pads on most cars will gas, due to their lower operating temperatures. Sport pads will be better for those who like to stop fast at higher speeds or those who are on the brakes long periods of time, without the need for big brake upgrades.
Increasing rotor size will also help, but, not without sport calipers. If both were adde the system may require true stainless steel teflon brakelines, and a possible upgraded booster and master cyl. to accomodate the increased pressure needed to keep clamping force up, along with race/syn brake fluid.
People looking for a little more bite for hard braking might find using sport pads and slotted rotors for gasing a real treat. This combo is best realized for hard driving (IE: autox, roadrace). I suggest replacing or bleeding the brake fluid to also help pedal feel after an install of this nature.
In conclusion, I have found people who do brake upgrades are disappointed, by the longevity of them. Pads and rotors are a wear and tear item, in most cases performance brake parts last 1/2 as long as OEM solutions. Knowing how to break them in and how they work is the driver's key to stopping faster.
M. Sanew - Dezoris
 AF Project Vehicle | Corporate